


If I'm presented with hours of free time (which is particularly relevant right now), it's almost guaranteed that I'll fill it by scouring YouTube's many corners. Then, around the eight-minute mark of a makeup tutorial, I'll realize that the rendition of a smokey eye for the girl in the video won't be the same on my monolid eyes.
After a few years of playing around with makeup and finding my favorite techniques, I've picked up a few tips on how to accentuate my monolids.
Let us slide into your dms 🥰
Get notified of top trending articles like this one every week! (we won't spam you)What are "monolids," exactly?
Monolids are eyelids that don't have a crease, and they're typically seen on East Asian people.

Take the Quiz: What’s Your Perfect Skincare Product for the 'Clean Girl' Look?
Take this quiz to discover the perfect skincare product for your “clean girl” routine!
Getting Started
Now, I'm not saying that the intricate tutorials aren't any good, but they aren't always helpful when we try decorating our lids with more colors and details that can actually fit. Perfecting a cut crease can be challenging when you don't have one to "cut." If you're struggling to find help with your makeup journey, these tips will guide you!
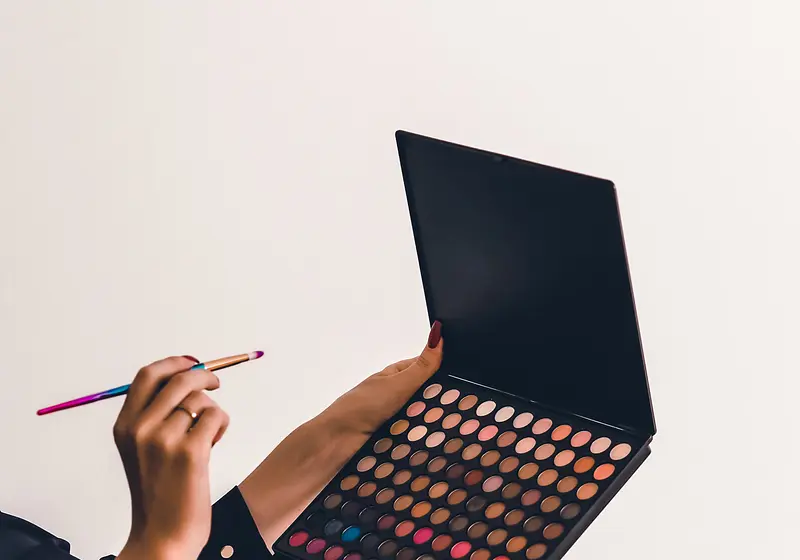
1. Find YOUR colors.
You may have already done this (whether you have monolids or not), but it's still a great first step to planning your future makeup routines. By finding the shades you love and feel confident in, you'll be able to simplify your palette collection and feel less overwhelmed when navigating your image.
I find that oranges, terracottas, and rusty pinks work best for me and my skin tone whenever I want to add some pizzazz to a regular day. Darker brown and black shadows are also a staple for any at-home MUA. This Morphe X Jaclyn Hill palette has everything that any natural-look lover needs.
Morphe X Jaclyn Hill Ring the Alarm eyeshadow palette: $16, morphe.com
I love the rusty brown transition shade in this Color Icon eyeshadow palette as an everyday pigment. The darkest brown helps me to bring depth to any look, and the formula is extremely smooth and easy to apply.
Color Icon - Not a Basic Peach 10-pan eyeshadow palette: $5.99, wetnwildbeauty.com
2. Start Small.
Any type of eyeshadow brush will work fine, but make sure that you have good control over where you're putting product. Control is especially important for this second tip: start small. Partially close one eye and put a single line of shadow right above your top lashline - almost like an eyeliner.
Repeat this process on the other eye, then open both eyes and see how much of the color is visible. Thicken the line of eyeshadow until you're satisfied, but take your time with it! You don't want to put too much at once and then have tons of fallout and wasted product.
You can also keep both of your eyes open and apply shadow directly on the the visible portions of your eye.
See these methods in action in this Beauty Insider tutorial with professional makeup artist Irene Kim. Suggested Clip: 2:20 - 2:50.
3. Bold or Subtle?
Before you go too far with your thick line of eyeshadow, decide whether or not you want your eyes to be the center of attention when people look at you. I don't have much room on my eyelid, so I tend to stick with harsher, thicker lines for my shadow for noticeable pops of color.
For softer looks, you can stick to one or two lines of solid product above your lashline and then blend out the harsh lines.
By knowing what your intended result will be, you're less likely to go overboard with pigments. Your subconscious will remind you of when to stop and recollect yourself before you fall into a whirlpool of color and end up brushing shadow up to your brow bone.
4. Follow your Eyes.
It's 2020 - we're celebrating and enhancing what we have.
For a while, I wanted to use makeup to make my eyes look similar to all of those other artists on the Internet. As a result, I failed miserably and backtracked to the first tip I shared. Finding the colors that I'm truly comfortable in made a huge difference in (and around) my eyes.
Once you find what looks good to you, you can achieve a simple, effortless look (because that's what it is!).
The second portion of this tip is to literally follow your eyes with your products. Don't try to change your eye shape to fit the tutorials. Use a few of your favorite pigments to your own advantage, and follow the shape of your eyes. You got a glimpse of this from Irene Kim in Tip #2.
5. Extend Outwards.
While you're going with the flow of your eye shape, don't be afraid to pull your liner and shadow outwards! Maybe don't drag your brush all the way to top of your ear, but that general direction is perfect for adding some oomph to your look.
If you're trying to get a smokey effect, keep the darker colors close to your lash line and move outwards as desired. Feel free to blend generously.
By sharply angling your eye products upwards, you create the illusion that your eye is smaller. Unless this is what you're going for, I'd stick to the outwards motions and avoid getting too close to your brows.
Watch Fenty Beauty Global Makeup Artist Priscilla Ono demonstrate outwards motions in this tutorial. Suggested Clip: 0:20 - 0:48.
6. Experiment with Mascaras.
A coat of mascara can do wonders whenever you've finally gotten your eyeshadow to look right and you don't want to risk messing it up with a shaky eyeliner application (which I am VERY prone to). If you haven't found your go-to mascara, you should get on it!
By applying mascara to your lashes, you add an extra lift to your eyes and emphasize your lashline in a way that's comparable to the effect of a typical liner. Furthermore, it'll compensate for the slight droop that you may have felt if you ditched your upwards brush strokes earlier.
Some mascaras that I use include this Covergirl Lash Blast volumizing mascara. The formula isn't heavy on my lashes, and it doesn't smudge under my eyes as severely as others. The flexible wand bristles are very gentle and non-clumping.
Covergirl Lash Blast Volume waterproof mascara: $6.19, target.com
I also like to use the Neutrogena Healthy Volume mascara for the same reasons, but it does tend to smudge a bit sooner than Lash Blast. Waterproof mascaras are ideal since monolids tend to have more fallout and potentially irritated and watery eyes.
Neutrogena Healthy Volume waterproof mascara: $7.59, target.com
In the past, I've tried Maybelline's Volum' Express The Rocket ($8.77, maybelline.com), Volum' Express The Falsies ($8.77, maybelline.com), and Great Lash ($7.40, maybelline.com) mascaras. The Express The Rocket was my first mascara, and I used it for a few years until I tossed it in the trash way past its expiration date. The latter two mascaras were a bit wet upon contact, but this is perfect for reapplying and building your mascara to any desired thickness.
Additionally, curling your lashes up can help with lift. Mine aren't very long to begin with, so curling them upwards has been a visible game-changer. Be sure to curl thoroughly and quickly follow with your mascara. If your eyelashes are anything like mine, it won't take long for them to succumb to gravity.
Time to Try It Out!
Please keep in mind that any products I've shared here are recommended to you based on my experiences with them; they may or may not work for your lids or lashes, but they're a great, affordable start to finding what you love most.
All of these tips are fairly generic and applicable to many different eye shapes, but I hope the monolidded gals of the world can especially benefit from them. Best of luck!