




As a short-nailed girly with no nail tools, I've struggled to find nail designs that I love and are easy to do. For the past few years, I've been experimenting with different nail designs on the internet. Here are some of my favorites and how YOU can replicate them on your own nails to look stylish this summer!

Lelê Breveglieri from Wikimedia Commons
Let us slide into your dms 🥰
Get notified of top trending articles like this one every week! (we won't spam you)Flowers
This is by far the easiest nail design to do! Best of all, it requires no professional nail tools and looks stunning!
What you will need:
- 3-4 colors that you want on your nails! I would recommend picking a family of colors, like different shades of pinks or blues, as well as white and a base color.
- A toothpick!
- Optional: A glossy or matte topcoat.

Creative Commons Attribution-Share Alike 4.0 from Wikimedia Commons
Instructions:
- Paint your thumb, pointer, and pinky finger a solid color from one of your nail polish shades. You can paint your middle finger a solid color too, if you want.
- Remember, you can do double coats if the polish looks too sheer!
- Let it dry! Don't rush nail art - a single movement can make you restart!
- Paint a base color (I really like to use a sheer tan color!) on your ring and/or your middle finger. This is the base for your flowers!
- Take an aluminum foil and dab some of your other nail polish colors.
- With your toothpick, dab a few spaced-out dots of white on your ring and/or middle finger. Now, take your other colors and dab 5-6 dots around the white dot. You have a flower!
- Optional: Once you finish, you can add a matte or glossy topcoat! This will ensure that your nails are protected!
And ta-da! You have super stylish and summery nails that will make you look like an absolute flower goddess!
PS: You can also use this toothpick-dotting technique to make polka dots!


Take the Quiz: Which Inside Out Character Are You?
Inside Out is a classic but what character matches you best?
Abstract - Marble
The beauty of abstract art is that there is no wrong way to do it! And the end result always looks stunning - no matter what!
What you will need:
- 3-4 shades of color. You can go for similar colors (ie. pinks and oranges) or you can choose random colors! The choice is yours!
- A small piece of clear plastic. I would recommend taking a Ziploc bag and cutting a few medium sized squares from it.
- A matte or glossy topcoat. For this design, a topcoat is essential!
- Vaseline! Since this design can get a little messy, I would highly encourage you to rub Vaseline all over your nail bed to ensure the polish doesn't stain!

Instructions:
- Dab little parts of each of your colors onto one of your nails. Don't worry if the colors overlap or look messy - it's going to turn out great!
- Once you've dabbed color all over your nail, take a plastic square and smush it all over your nail. Don't mix the colors too much!
- Take off the plastic square and let the polish dry!
- Once the nail polish has dried, put a matte or glossy topcoat over it, smoothing out the nail polish and creating a beautiful, blended effect!
- Repeat on all of your nails!
And there you have it! Stunning marbled nails that look perfect for summer!
PS: If you're a little confused, I would recommend watching this video (0:31 - 1:27).
Stripes
This design is as simple as it gets - layering different colors of nail polish on your nail!
What you will need:
- 1-5 colors of nail polish! The colors are completely up to you :)
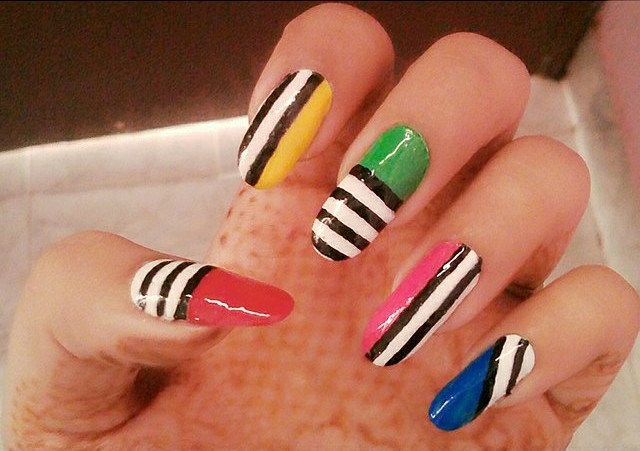
Muskan Talreja05 from Wikimedia Commons
Instructions:
- Paint each of your nails a solid color. They can all be different colors like the picture above or the same! Let it dry fully!
- Paint one different color of nail polish in a triangle at the corner of your nail. If you want straight stripes, you can also paint it straight at the top of your nail.
- Paint another color of polish on top of the first one but leave some gap in the middle to create a stripe!
- Repeat until you reach the edge of your nail!
- Repeat on all of your nails!
Congratulations - you've made one of the most classic nail designs without any nail tools at all! It looks perfect for a summer vacation or just roaming around!
PS: If you don't fully understand, or your stripes aren't coming out great, I would encourage you to watch this video (1:27 - 1:52).
Conclusion

Courtney Rhodes from Wikimedia Commons
I love doing my nails, and these three nail designs are always my go-to. Hopefully, by sharing my favorite designs, you've been able to rock stylish nails with minimal effort!
And if you haven't yet mastered nail art (don't worry, neither have I) - remember, practice makes perfect!